How to Adjust Lighting & Override Appearance Indicator in Autodesk Inventor
July 12, 2023 2023-09-07 11:16How to Adjust Lighting & Override Appearance Indicator in Autodesk Inventor
How to Adjust Lighting & Override Appearance Indicator in Autodesk Inventor
In the world of Autodesk Inventor, mastering the art of lighting is crucial to create visually stunning designs. Understanding how to control and change the direction of lighting can significantly enhance the realism and presentation of your 3D models. In this blog post, we will explore step-by-step techniques and primary methods to alter the direction of lighting in Autodesk Inventor. Whether you are a beginner or an experienced user, this guide will equip you with the skills needed to elevate your designs to the next level. Join us as we unlock the secrets of manipulating lighting and bring your models to life.
Recently we posted “How To Get Ortho Views & Predefined View Indicators from View Cubes” and now we are sharing two new tips from our “120 Autodesk Inventor Tips” vault.
Our Autodesk Subject Matter Expert from i GET IT Learning created these 120 short tech tips to present at Autodesk University. Till now we have shared the first 22 tips on PLM Tech Talk and now we are sharing the next 2. To get early access of tips visit myigetit.com and subscribe to gain access to many other Tips.
Steps to Change Direction of Lighting in Autodesk Inventor
#23 Reorient Lighting - 120 Autodesk Inventor Tips
Lighting plays a fundamental role in shaping the atmosphere and enhancing the functionality of any environment. Whether it’s an architectural project, interior design, or a visual presentation, the way we illuminate spaces can greatly impact the overall experience and perception. With the advent of advanced technologies and design software, professionals in the fields of architecture, engineering, and design can now harness the power of tools like Autodesk to reorient lighting and transform the way we interact with our surroundings.
Follow these steps to reorient the lighting in your design to the desired direction:
Step 1

Wrong Ground Shadow Direction
- Orient model view to look at desired “Front” of model
Step 2
- Right-Click View Cube > Set Current View As > Front

Step 3

Correct Ground Shadow Direction
Check out our complete catalog of courses for engineering students and professionals. Stay tuned to i GET IT tech blog for more such tips.
Override Appearance Indicator in Autodesk Inventor
In this blog post, we will dive into the world of Autodesk Inventor and explore the step-by-step process of overriding the appearance indicator. Whether you are a designer, engineer, or enthusiast, this guide will empower you to take full control of the appearance of your models and unleash your creativity. Join us as we unravel the secrets of overriding the appearance indicator in Autodesk Inventor and unlock a world of endless design possibilities.
Steps to Override Appearance Indicator in Autodesk Inventor
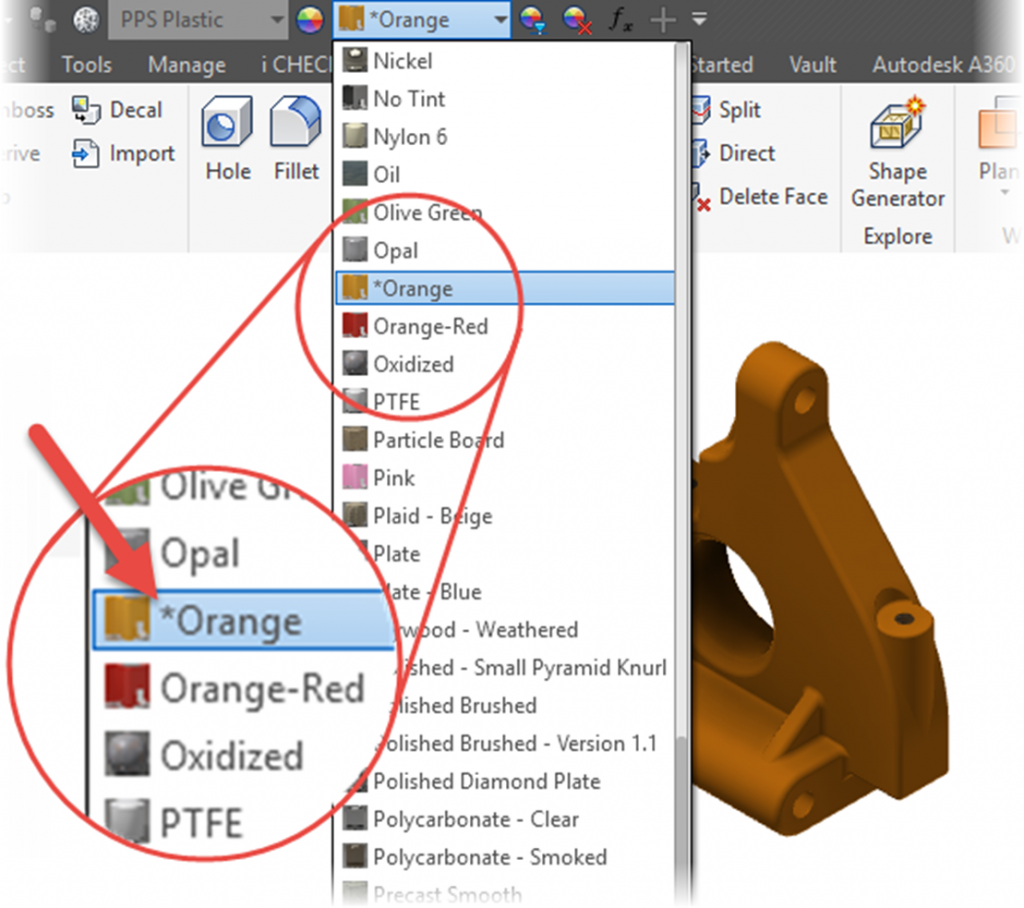
#24 Appearance Override Indicator
Asterisk * next to Appearance name in Appearance dropdown list indicates that this appearance color is Overriding the MaterialAppearance

About i GET IT
i GET IT is our Tata Technologies eLearning solution designed to teach engineers how to be better in using today’s leading MCAD (Mechanical Computer Aided Design) applications and design skills
For more tech tips and in-depth eLearning for Autodesk, including this and new courses on other design solutions, please visit https://www.myigetit.com. You can sign up and get FREE Subscription of our informative Newsletter.
Start your Upskilling Journey Now!
If you should have any questions, please reach out to iproducts@tatatechnologies.com or igetitsupport@tatatechnologies.com for help.
Manya
Related Posts
What is Fluid Mechanics? – Introduction, Laws & Equations
What Is AutoCAD Software? Uses, Features & Practical Examples
Independent Front Wheel Suspension – Types, Benefits & Working
What is PLM? – Product Lifecycle Management [Detailed Guide]
Lead-Acid vs. Lithium-Ion Batteries: Key Differences & Best Uses
Find
Categories
Latest Posts
What is Fluid Mechanics? – Introduction, Laws & Equations
January 7, 2026What Is AutoCAD Software? Uses, Features & Practical Examples
December 18, 2025Independent Front Wheel Suspension – Types, Benefits & Working
November 10, 2025Popular Tags


